
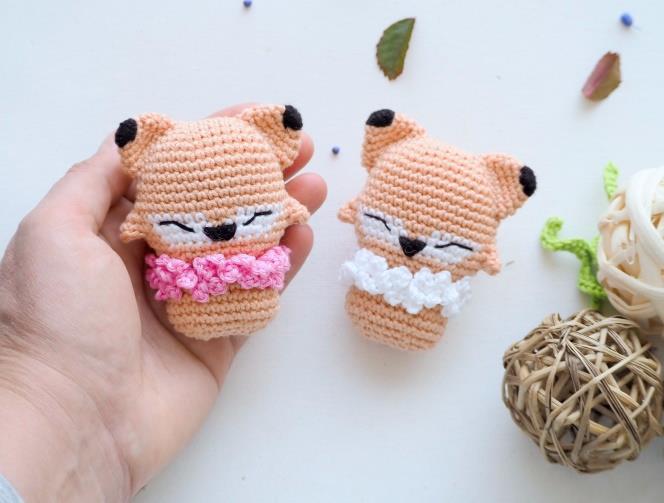


Olá, meus queridos amantes de amigurumi, hoje vamos aprender a fazer um filhote de raposa em crochê. Hoje começarei a postar esses lindos e fofos brinquedos de crochê para crianças pequenas.
A coleção completa será composta por doze animais de crochê.
E o primeiro padrão a ser postado será o do filhote de raposa.
Então, vamos pegar nossa agulha e linha e… vamos tecer arte!
E aproveite para conferir nossas outras receitas de amigurumi, todas gratuitas para você:
Personagens:
Baby Minnie Mouse
Baby Mickey
Receita Leitão Amigurumi
Bebê Raposa de Crochê

The pattern is written in English using US crochet terminology. Instructions are easy to follow if you are familiar with basic crochet
techniques.
Materials:
• 2.5 mm hook
• Cotton yarn
(I used Schachenmayr Catania “originals”)
– Light orange, white, cream, brown
– Green, yellow, pink, purple, munt
• Black embroidery thread
• Safety eyes 6.00 mm
• Stuffing
• Yarn needle
• Stitch marker
The toys are approximately 7-9 cm from top to bottom. It may vary though depending on the kind of yarn and hook size used.
You can also use any color of yarn.
Feel free to add accessories to your very own baby toys.
Abbreviations:
• ch – chain
• sc – single crochet
• st/sts – stitch/stitches
• inc – increase
• dc – double crochet
• hdc – half double crochet
• dec – decrease
• slst – slip stitch
• BLO – use the black loop only
• FO – fasten of
HEAD
Use the orange yarn.
Ch 6. Stitches are worked around both sides of the foundation chain.
Rnd 1: start in second chain from the hook, inc in this stitch, 3 sc, 3 sc in last st. Continue on the other side of the foundation chain, 4 sc, (fig 1) [12]
Rnd 2: 2 inc, 3 sc, 3 inc, 3 sc, inc [18]
Rnd 3: (sc, inc) x2, 3 sc, (sc, inc) x3, 4 sc, inc [24]
Rnd 4: (2 sc, inc) x2, 3 sc, (2 sc, inc) x3, 5 sc, inc [30]
Rnd 5: 2 sc, (inc, 3 sc) x2, 3 sc, (inc, 3 sc) x3, 3 sc, inc, sc (fig 2) [36]


Rnd 6-10: sc around, (fig 3) [36], 5 rounds

Rnd 11: 3 sc, 3 sc in next stitch (it means, crochet 3 sc in one stitch), 17 sc, 3 sc in next stitch, 14 sc [40]
How to change the color of yarn:
With the two loops from the previous yarn on the hook (fig 4), wrap the new yarn around the hook, then pull the new yarn through the two loops of the stitch (fig 5).


• Tip: I use one way that’s quite easy and works well, leaving the yarn we don’t use behind the work. When it’s time to use again, pick the yarn up again and carry it across the back (inside) of your work before making the next color change.
Of course, you can use your technique to work with two or more colors
•Tip: give the tail of the previous yarn a nice tug when changing yarn colors, to prevent loose stitches. You will notice the big loops
at the back. Make sure the loops are loose enough to stretch when you stuff the head.
Otherwise, you will have a scrunched fox face.
Rnd 12: orange yarn: 4 sc, 3 sc in next stitch, 2 sc, (attach the white yarn, be sure that the next stitch will be white), white yarn: 6 sc (fig 6),
orange yarn: 3 sc, white yarn: 6 sc, orange
yarn: 2 sc, 3 sc in next stitch, 15 sc, (fig 7) [44]


• Tip: to avoid holes that can occur when changing colors, make sure to lay the previously used yarn flat on the backside (inside) while making the next two single crochet stitches. This will secure the previously used yarn in place and gaps should not form at the color change points (fig 8).
Rnd 13: orange yarn: 5 sc, 3 sc in next stitch, 4 sc, white yarn: 6 sc, orange yarn: sc, white yarn: 6 sc, orange yarn: 4 sc, 3 sc in next stitch, 16 sc, (fig 9) [48]
Rnd 14: orange yarn: 4 sc, skip 6 stitches and insert the hook in next stitch (fig 10, 11), 3 sc, white yarn: 11 sc, orange yarn: 4 sc, skip next 6 stitches, 14 sc, (fig 12) [36]


Cut the white yarn.
Rnd 15: 34 sc, put your stitch marker here. It will be the new beginning (fig 13). [34]
Rnd 16: (dec, 3 sc) x3, 3 sc, (dec, 3 sc) x3, 3 sc [30]
Start to stuff the head

Rnd 17: (dec, 2 sc) x3, 3 sc, (dec, 2 sc) x3, 3 sc [24]
Rnd 18: (4 dec, 4 sc) x2 [16]
Stuff the head firmly (fig 14).

Don’t cut the yarn, we continue to crochet
body.
BODY
Rnd 19: (3 inc, 5 sc) x2 [22]
Rnd 20: sc around [22]
Rnd 21: (sc, inc) x3, 5 sc, (sc, inc) x3, 5 sc [28]
Rnd 22-24: sc around [28], 3 rounds
Rnd 25: sc, (dec, 2 sc) x3, 2 sc, (dec, 2 sc) x3, sc [22]
Rnd 26: sc, (dec, sc) x3, 2 sc, (dec, sc) x3, sc [16]
Crochet 3 sc more, after round 26 to bring the tail of yarn in the corner of body.
Stuff the body firmly.
Cut the yarn leaving a tail for closing.
How to finish:
Using the long tail of yarn, start from second loop. Sew the opening through the front loops by going across each stitch (fig 15 and 16).


EARS (make 2)
Rnd 1: 6 sc in a magic ring [6]
Rnd 2: (sc, inc) x3 [9]
Rnd 3: (2 sc, inc) x3 [12]
Rnd 4: (3 sc, inc) x3 [15]
Rnd 5: sc around [15]
Cut the yarn leaving a tail.
Place the ears between rounds 1 and 9 (fig 18).
Sew it around to head.


Embroider the small nose and eyes using black thread.


Make a little black on the top of ear using the embroidery thread (fig 22).

COLLAR
Ch 20. Make sure your chain isn’t twisted.
Rnd 1: start in second chain from the hook: 19 sc [19]
Rnd 2: make a next combination: (5 ch, slst), do it twice in each stitch (fig 23, 24, 25).
Repeat it 19 times.


And voila, now you have your baby fox.
So that’s it folks.
If you liked these recipes or if you have any questions, leave them in the comments. I will love to know your opinion.
And take the opportunity to check out our other amigurumi recipes, all free for you:
Artigos Relacionados


Sobre o Autor

0 Comentários